
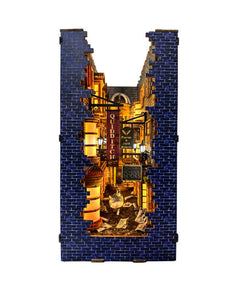

What Is A Book Nook?
Fancy yourself magically transported to anywhere in the literary universe: Diagon Alley or in Harry’s cupboard room, or by the Prancing Pony gate in Lord of the Rings, or in Dr. Victor Frankenstein’s laboratory. Where do you want to find or lose yourself?
Indeed, your imagination knows no boundaries, and story scenes will seem to materialize right before you as you read books. But what if you could immerse yourself even further by looking into a small box—finding yourself in the middle of your favorite or iconic scene in a story? How awesome is that? Even if you do not get the chance to reread your favorite books, you’ll love how they come alive every time you pass by your bookshelf and peek into that book nook.
Book nooks inspire the bookworm in almost everyone to pick up a book and dive in, devouring each and every word read with so much gusto. These miniature scene creations have that power. As a result, book nooks have become popular with many book clubs and artisan groups, and they just cannot get enough of them.

Materials You Will Need
You will need:
- PVC board or cardboard
- Box cutter
- Super glue
- Acrylic paint
- Paintbrushes
- Printouts
- Pebbles and small toys you can paint and use
- Plastic cover/acrylic sheet for the windows
- Battery-operated LED light
Prepare the Walls
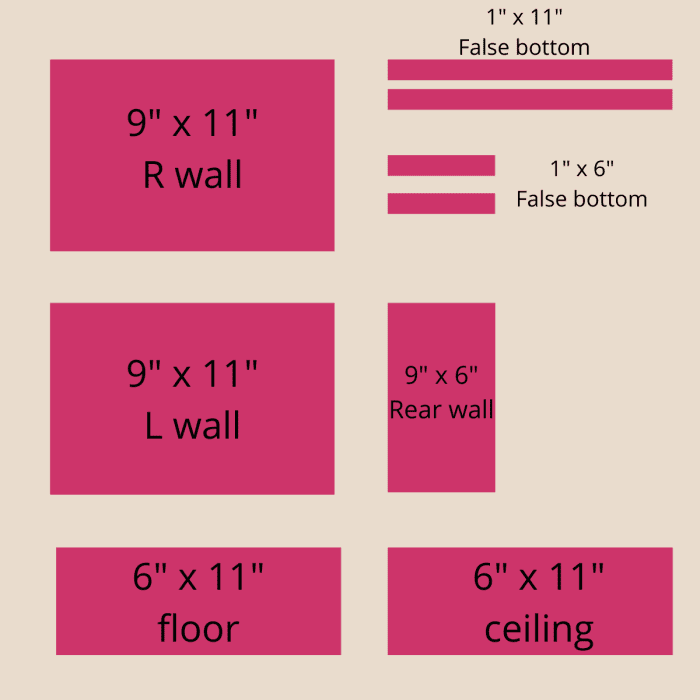
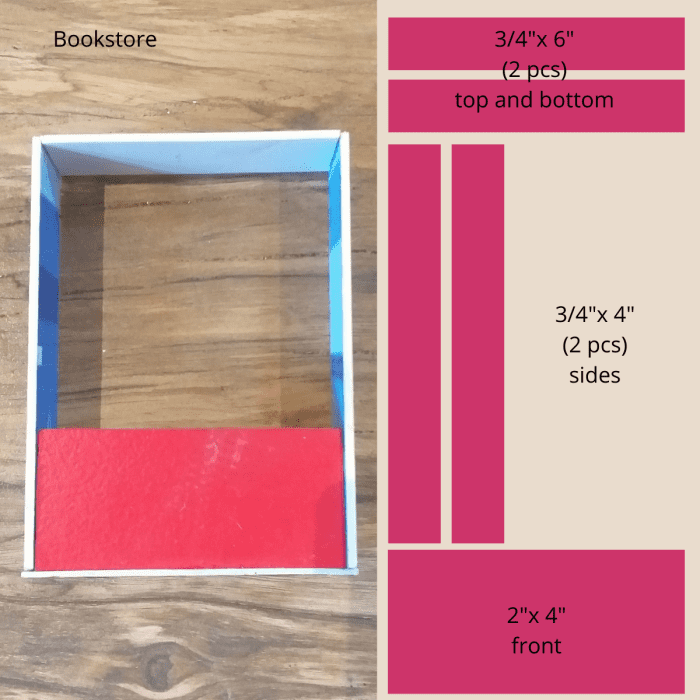
Start with the walls, ceiling, and floor. Here are the dimensions for the body of the nook. You can change the dimensions if you wish.
Cut out these measurements. These nooks are created wall by wall. The walls are then glued together in the end.
The Left Wall and Door
Let's start with the left wall. Then follow these steps for the door:
- Cut out the door and its windows.
- Attach the sides using super glue.
The Window
- Cut out the main store window.
- Glue all the parts together. Follow the picture below.
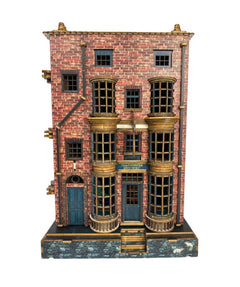
Bookstore Display Window
The Roof
- Make the roof. Cut out a 3" x 7" piece of the board, serving as its base.
- Cut out 1" x 1" boards and use them as shingles.
- Start with the bottom layer first.
Paint Your Cutouts
You'll need to paint the door and the window with acrylic paint. You can use brown or any color of your choice.
As for the roof, paint it with a combination of light and dark grey. You can create a weathered effect by dry brushing on top of the base color.
Use an acrylic sheet or a thick plastic cover for the windows. Cut out a plastic piece that would fit into the back of the window and the back of the door.
Prepare the Printouts
- Bricks: Print out several pages of bricks and glue them onto the right, left, and rear walls. If your paper is not enough to cover the board, add a few more sheets while ensuring the bricks all line up perfectly. You can use paper or print the design on sticker paper.
- Bookshelf: Print out the bookshelves and glue them directly on top of the bricks. Glue small pieces of the bricks onto the sides of the door frame and the window frame.
Note: Make sure that the printout sits inside the door and window structure.
Create and Glue the Right Wall
For the right wall of the nook:
- Print and glue the brick printout onto the board.
- Cut 2 pieces of 1 1/2" x 9" and 3/3" x 9" boards.
- Place the thinner board on top of the thicker ones. Glue them together.
- Add the bottom and top boards to create a frame.
Prepare the Floor
For the floor, I chose this outdoor tile print. You can change it into a mosaic or paver, or you can paint it to give it a concrete look.
Assemble the Walls
Follow this assembly procedure:
- Step 1: Glue the right wall onto the floor first.
- Step 2: Glue the rear wall next. Add wall accessories/posters at this point.
- Step 3: Glue the left wall complete with accessories.

Tips for Adding Accessories
You can add signage to make your nook look like a "bookstore," or you could change it into a coffee shop if you wish. Add some hanging signs as well, and by painting bendable straws and wooden dowels, you can make these look like pipes. The more details added to the scene, the better it becomes.
Add some painted matchboxes, bobbins, and printed posters (print out different-sized posters), and pick out the one that would best suit the space. Add some dollhouse plants as well.
Continue the Assembly
Step 4:
- Paint the outside of the box. If you haven't done so already, paint at least 3 coats. You can also cover it with printed paper, sticker, or faux leather to make it look more like a book.
- Glue on the top cover or board. Print out a design of your choice. In this case, I printed out a dusky sky.
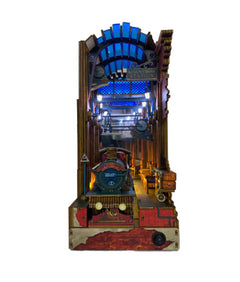
Step 5:
- Add small battery-operated LED lights to several areas of the box.
- Add one or two lights to the ceiling. You can paint the plastic portion to match the sky color.
- I also placed a light inside the bookstore window. To do this, you need to puncture a small hole at the bottom where the store window is located and allow the LED light to poke out into the crevice. We will cover up the light by making a false floor later on, in the next step.
- Hide a few LED lights behind the plants.
Step 6:
- Cut out an arch shape and cover it with printed brick paper.
- Glue this onto the entrance of the nook.
- Take the 1" x 11" strips (two pieces) and 1" x 6" strips (two pieces) that you have left. Glue them together to form an open box.
- Paint this as well, and place the book nook on top to conceal the light mechanism underneath.
- Glue the false bottom to the body of the nook.

Good Luck, LKWood <3